- Getting Started
- Installation
- Key Concepts
- Integrations
- Account & Billing
- Security & Privacy
- PDF Generation
- Reference
- Tutorials
- Troubleshooting
- Excel Generation
- Reference
- Troubleshooting
How to create a PDF with Printer's Marks
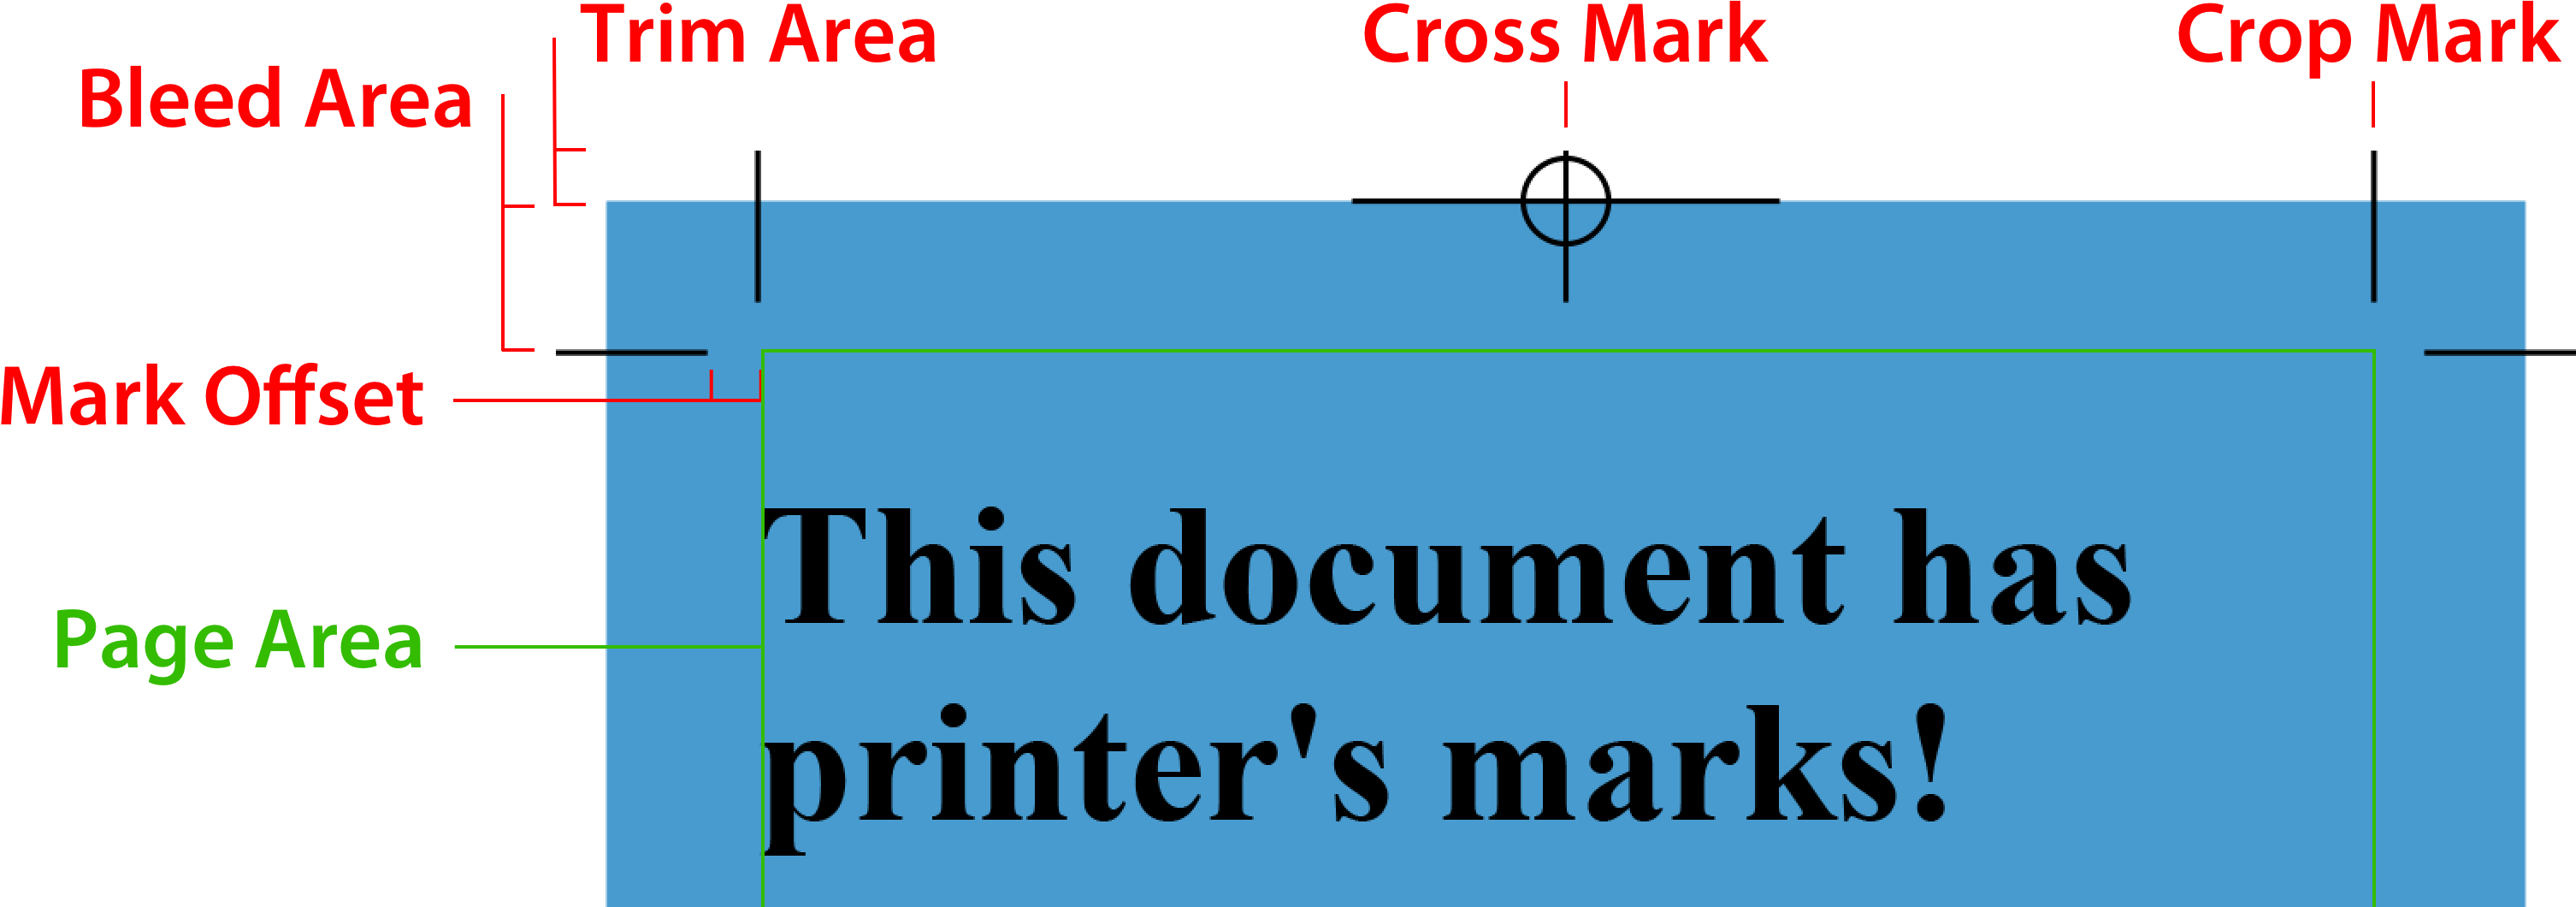
Printer's marks are special marks added to the document margin. They assist the printer with alignment and trimming. After the document is printed, the printer trims off the marks and margin.
A "crop" mark is printed immediately outside of the desired final, post-trim, content. It tells the printer precisely where the document is to be trimmed and is often used for full-bleed documents.
A "cross" or "registration" mark is used to help align the paper for documents that need multiple printing passes, such as four color printing or embossing.
Thanks to the Prince PDF engine, DocRaptor supports both crop and cross marks as defined in the CSS Paged Media specifications. Full support for CSS Paged Media is one of the differences between DocRaptor and browser-based open source HTML to PDF libraries.
Add the printer's marks
Simply add crop, cross, or both to the marks property of a CSS @page rule:
@page {
  marks: crop cross;
}
Customize bleed and trim sizing
When using marks, DocRaptor assumes you want a full-bleed document where the background colors and repeated backgorund images extend past the edge of the document and then trimmed off by the printer. The size of this extended background area is called the "bleed". By default, whenever you use the marks property, DocRaptor adds a 6pt bleed, but you can adjust this with CSS:
@page {
  bleed: 0.75cm;
  marks: crop cross;
}
The marks sit outside the bleed area but inside the trim area. The trim area size defaults to 57pt 48pt, but it can also be adjusted:
@page {
  -prince-trim: 0.25cm;
  bleed: 0.75cm;
  marks: crop cross;
}
Both the bleed and trim areas are added to the page size. So with an 8cm square page, the page will be 8cm square, but the paper size will need to be 9cm square:
@page {
  page: 8cm 8cm; /* print on 9cm 9cm paper */
  -prince-trim: 0.25cm;
  bleed: 0.75cm;
  marks: crop cross;
}
Customize the marks
In addition to customizing the bleed and trim areas, with DocRaptor you can adjust the marks themselves:
@page {
  -prince-mark-length: 1cm;
  -prince-mark-width: 1px;
  -prince-mark-offset: 0.25cm; /* offset between marks and page area, defaults to bleed */
  page: 8cm 8cm;
  -prince-trim: 0.25cm;
  bleed: 0.75cm;
  marks: crop cross;
}
Final Result
We've covered a lot of CSS properties that can interact with each other in different ways. Here's a screenshot of the final PDF with every element and area outlined:
To try this in your preferred programming language, you can download or copy any of the DocRaptor HTML to PDF API's full source code examples below.
Using DocRaptor's API
Below are the basics of using DocRaptor's HTTP API. It can easily be used in any programming language, but if we don't have a native agent for your language, please let us know! That'll help us write the best examples and agents.
The API key shown here, YOUR_API_KEY_HERE, actually works! Use it for testing without creating an account. The only requirement is test mode must be used (test parameter set to true).
To make documents, send a POST request to this URL:
https://YOUR_API_KEY_HERE@api.docraptor.com/docsSend JSON-encoded API parameters (you'll need to set an HTTP header for Content-Type as application/json). These are the only required parameters:
{
  "type": "pdf",
  "document_content": "Hello World!"
}
Generating the Document with cURL
Here's a completely functional code sample for this tutorial:
cat <<-'DOCUMENT_OPTIONS' > docraptor_parameters.json
  {
    "test": true,
    "document_type": "pdf",
    "document_content": "<h1>This document has printer's marks!</h1><style>@page {-prince-mark-length: 1cm;-prince-mark-offset: 0.25cm; /* offset between marks and page area, defaults to bleed */-prince-mark-width: 1px;marks: crop cross;size: 8cm 8cm;-prince-trim: 0.25cm;bleed: 0.75cm;margin: 0;background-color: #489bcf;}</style>"
  }
DOCUMENT_OPTIONS

curl https://YOUR_API_KEY_HERE@api.docraptor.com/docs \
  --fail --silent --show-error \
  --header "Content-Type:application/json" \
  --data @docraptor_parameters.json \
  > printers-marks.pdf
Downloads
Here are all the files you need to follow this tutorial:
Related Tutorials & Documentation
See the complete PDF tutorial list or review the documentation for additional info, such as generating asynchronous documents.
Frameworks supported
- .NET 4.0 or later
- Windows Phone 7.1 (Mango)
Dependencies
- RestSharp - 105.2.3 or later
- Json.NET - 7.0.0 or later
- JsonSubTypes - 1.2.0 or later
Installing the .NET Agent
With Nuget:
nuget.exe install DocRaptorWith the Package Manager Console:
Install-Package DocRaptorYou can also download the DLL directly from GitHub.
Generating the Document
The API key shown here, YOUR_API_KEY_HERE, actually works! Use it for testing without creating an account. The only requirement is test mode must be used (test parameter set to true).
using DocRaptor.Client;
using DocRaptor.Model;
using DocRaptor.Api;
using System;
using System.IO;

class DocRaptorExample
{
    static void Main(string[] args)
    {
        DocApi docraptor = new DocApi();
        // this key works in test mode!
        docraptor.Configuration.Username = "YOUR_API_KEY_HERE";

        try
        {
            Doc doc = new Doc(
                name: "printers-marks",
                test: true, // test documents are free but watermarked
                documentType: Doc.DocumentTypeEnum.Pdf,
                documentContent: System.IO.File.ReadAllText(@"printers-marks-content.html")
                // documentUrl: "https://docraptor.com/examples/invoice.html",
                // javascript: true,
                // princeOptions: new PrinceOptions(
                //     media: "print", // @media 'screen' or 'print' CSS
                //     baseurl: "https://yoursite.com" // the base URL for any relative URLs
                // )
            );

            byte[] document = docraptor.CreateDoc(doc);
            File.WriteAllBytes("printers-marks.pdf", document);
            Console.WriteLine("Successfully created printers-marks.pdf!");
        } catch (DocRaptor.Client.ApiException error) {
            Console.Write(error.ErrorContent);
        }
    }
}
Downloads
Here are all the files you need to follow this tutorial:
Related Tutorials & Documentation
See the complete PDF tutorial list or review the documentation for additional info, such as generating asynchronous documents.
Install the Java Agent
Add the com.docraptor package to your project. For example, with Maven you'd add the DocRaptor package to your pom.xml:
<dependency>
  <groupId>com.docraptor</groupId>
  <artifactId>docraptor</artifactId>
  <version>3.0.0</version>
</dependency>
And then install it:
mvn install com.docraptorGenerating the Document
The API key shown here, YOUR_API_KEY_HERE, actually works! Use it for testing without creating an account. The only requirement is test mode must be used (test parameter set to true).
import com.docraptor.*;
import java.io.*;
import java.net.*;
import java.nio.file.*;

public class DocRaptorExample {

  public static void main(String[] args) throws Exception {
    DocApi docraptor = new DocApi();
    ApiClient client = docraptor.getApiClient();
    client.setUsername("YOUR_API_KEY_HERE"); // this key works in test mode!

    try {
      Doc doc = new Doc();
      doc.setTest(true); // test documents are free but watermarked
      doc.setDocumentType(Doc.DocumentTypeEnum.PDF);

      doc.setDocumentContent(new String(Files.readAllBytes(Paths.get("printers-marks-content.html"))));

      // doc.setDocumentUrl("https://docraptor.com/examples/invoice.html");
      // doc.setJavascript(true);
      // PrinceOptions princeOptions = new PrinceOptions();
      // princeOptions.setMedia("print"); // @media 'screen' or 'print' CSS
      // princeOptions.setBaseurl("https://yoursite.com"); // the base URL for any relative URLs
      // doc.setPrinceOptions(princeOptions);

      byte[] document = docraptor.createDoc(doc);

      // createDoc() returns a binary string
      FileOutputStream file = new FileOutputStream("printers-marks.pdf");
      file.write(document);
      file.close();
      System.out.println("Successfully created printers-marks.pdf!");
    } catch (ApiException error) {
      System.err.println(error);
      System.err.println(error.getCode());
      System.err.println(error.getMessage());
      System.err.println(error.getResponseBody());
    }
  }
}
Downloads
Here are all the files you need to follow this tutorial:
Related Tutorials & Documentation
See the complete PDF tutorial list or review the documentation for additional info, such as generating asynchronous documents.
The DocRaptor JavaScript Library
The DocRaptor JavaScript library makes it easy to create PDFs with JavaScript. The library does not require jQuery, but you can use jQuery to define your document content. When a PDF is requested, the library constructs a hidden form and submits it to the DocRaptor API. The form is necessary to trigger the browser download window.
This library exposes your API key in your website source code. This code should never be used in a publicly-accessible location, instead try using our referrer-based API or a server-side agent such as PHP or Ruby.
JavaScript Example
<html>
  <head>
    <script src="https://docraptor.com/docraptor-1.0.0.js"></script>
    <script>
      var downloadDocumentFrom = function(selector) {
        // this key works in test mode!
        DocRaptor.createAndDownloadDoc("YOUR_API_KEY_HERE", {
          name: "printers-marks",
          test: true, // test documents are free but watermarked
          document_type: "pdf",
          document_content: document.querySelector(selector).innerHTML
          // document_url: "https://docraptor.com/examples/invoice.html",
          // javascript: true,
          // prince_options: {
          //   media: "print", // @media 'screen' or 'print' CSS
          //   baseurl: "https://yoursite.com", // the base URL for any relative URLs
          // }
        });
      };
    </script>
    <style>
      @media print {
        #download-button {
          display: none;
        }
      }
    </style>
  </head>
  <body>
    <h1>This document has printer's marks!</h1>
    <style>
      @page {
        -prince-mark-length: 1cm;
        -prince-mark-offset: 0.25cm; /* offset between marks and page area, defaults to bleed */
        -prince-mark-width: 1px;
        marks: crop cross;
        size: 8cm 8cm;
        -prince-trim: 0.25cm;
        bleed: 0.75cm;
        margin: 0;
        background-color: #489bcf;
      }
    </style>
    <button id="download-button" type="button" onclick="downloadDocumentFrom('html')">Download Document</button>
  </body>
</html>
Downloads
Here are all the files you need to follow this tutorial:
Related Tutorials & Documentation
See the complete PDF tutorial list or review the documentation for additional info, such as generating asynchronous documents.
DocRaptor & Node.js
The best way to use DocRaptor with Node.js is directly through our HTTP API. In this example, we'll use the axios module, but you can obviously use any HTTP client you'd like.
Install the Axios Module
npm install axiosGenerating the Document
The API key shown here, YOUR_API_KEY_HERE, actually works! Use it for testing without creating an account. The only requirement is test mode must be used (test parameter set to true).
const axios = require("axios");
const fs = require("fs");

const document_content = `
  <h1>This document has printer's marks!</h1>
  <style>
    @page {
      -prince-mark-length: 1cm;
      -prince-mark-offset: 0.25cm; /* offset between marks and page area, defaults to bleed */
      -prince-mark-width: 1px;
      marks: crop cross;
      size: 8cm 8cm;
      -prince-trim: 0.25cm;
      bleed: 0.75cm;
      margin: 0;
      background-color: #489bcf;
    }
  </style>
`;

config = {
  url: "https://api.docraptor.com/docs",
  method: "post",
  responseType: "arraybuffer", //IMPORTANT! Required to fetch the binary PDF
  headers: {
    "Content-Type": "application/json"
  },
  data: {
    user_credentials: "YOUR_API_KEY_HERE", // this key works in test mode!
    doc: {
      test: true, // test documents are free but watermarked
      document_type: "pdf",
      document_content: document_content
      // document_url: "https://docraptor.com/examples/invoice.html",
      // javascript: true,
      // prince_options: {
      //   media: "print", // @media 'screen' or 'print' CSS
      //   baseurl: "https://yoursite.com", // the base URL for any relative URLs
      //   }
    }
  }
};

axios(config)
  .then(function(response) {
    fs.writeFile("printers-marks.pdf", response.data, "binary", function(writeErr) {
      if (writeErr) throw writeErr;
      console.log("Saved printers-marks.pdf!");
    });
  })
  .catch(function(error) {
    // DocRaptor error messages are contained in the response body
    // Since the response is binary encoded, let's decode
    var decoder = new TextDecoder("utf-8");
    console.log(decoder.decode(error.response.data));
  });
Downloads
Here are all the files you need to follow this tutorial:
Related Tutorials & Documentation
See the complete PDF tutorial list or review the documentation for additional info, such as generating asynchronous documents.
Installing the PHP Agent
composer require docraptor/docraptorGenerating the Document
The API key shown here, YOUR_API_KEY_HERE, actually works! Use it for testing without creating an account. The only requirement is test mode must be used (test parameter set to true).
<?php

require_once __DIR__ . "/vendor/autoload.php";

$docraptor = new DocRaptor\DocApi();
# this key works in test mode!
$docraptor->getConfig()->setUsername("YOUR_API_KEY_HERE");

$document_content = <<<DOCUMENT_CONTENT
  <h1>This document has printer's marks!</h1>
  <style>
    @page {
      -prince-mark-length: 1cm;
      -prince-mark-offset: 0.25cm; /* offset between marks and page area, defaults to bleed */
      -prince-mark-width: 1px;
      marks: crop cross;
      size: 8cm 8cm;
      -prince-trim: 0.25cm;
      bleed: 0.75cm;
      margin: 0;
      background-color: #489bcf;
    }
  </style>
DOCUMENT_CONTENT;

try {
    $doc = new DocRaptor\Doc();
    $doc->setTest(true); # test documents are free but watermarked
    $doc->setDocumentType("pdf");
    $doc->setDocumentContent($document_content);
    # $doc->setDocumentUrl("https://docraptor.com/examples/invoice.html");
    # $doc->setJavascript(true);
    # $prince_options = new DocRaptor\PrinceOptions();
    # $doc->setPrinceOptions($prince_options);
    # $prince_options->setMedia("print"); # @media 'screen' or 'print' CSS
    # $prince_options->setBaseurl("https://yoursite.com"); # the base URL for any relative URLs

    $response = $docraptor->createDoc($doc);

    # createDoc() returns a binary string
    file_put_contents("printers-marks.pdf", $response);
    echo "Successfully created printers-marks.pdf!";
} catch (DocRaptor\ApiException $error) {
    echo $error . "\n";
    echo $error->getMessage() . "\n";
    echo $error->getCode() . "\n";
    echo $error->getResponseBody() . "\n";
}
Downloads
Here are all the files you need to follow this tutorial:
Related Tutorials & Documentation
See the complete PDF tutorial list or review the documentation for additional info, such as generating asynchronous documents.
Installing the Python Agent
pip install --upgrade docraptorGenerating the Document
The API key shown here, YOUR_API_KEY_HERE, actually works! Use it for testing without creating an account. The only requirement is test mode must be used (test parameter set to true).
import docraptor

doc_api = docraptor.DocApi()
# this key works in test mode!
doc_api.api_client.configuration.username = 'YOUR_API_KEY_HERE'

document_content = r"""
    <h1>This document has printer's marks!</h1>
    <style>
      @page {
        -prince-mark-length: 1cm;
        -prince-mark-offset: 0.25cm; /* offset between marks and page area, defaults to bleed */
        -prince-mark-width: 1px;
        marks: crop cross;
        size: 8cm 8cm;
        -prince-trim: 0.25cm;
        bleed: 0.75cm;
        margin: 0;
        background-color: #489bcf;
      }
    </style>
"""

try:
    response = doc_api.create_doc({
        'test': True,  # test documents are free but watermarked
        'document_type': 'pdf',
        'document_content': document_content,
        # 'document_url': 'https://docraptor.com/examples/invoice.html',
        # 'javascript': True,
        # 'prince_options': # {
        #    'media': 'print', # @media 'screen' or 'print' CSS
        #    'baseurl': 'https://yoursite.com', # the base URL for any relative URLs
        # },
    })

    # create_doc() returns a binary string
    with open('printers-marks.pdf', 'w+b') as f:
        binary_formatted_response = bytearray(response)
        f.write(binary_formatted_response)
        f.close()
    print('Successfully created printers-marks.pdf!')
except docraptor.rest.ApiException as error:
    print(error.status)
    print(error.reason)
    print(error.body)
Downloads
Here are all the files you need to follow this tutorial:
Related Tutorials & Documentation
See the complete PDF tutorial list or review the documentation for additional info, such as generating asynchronous documents.
Installing the Ruby Agent
Add or require the docraptor gem to your project or script.
Generating the Document
The API key shown here, YOUR_API_KEY_HERE, actually works! Use it for testing without creating an account. The only requirement is test mode must be used (test parameter set to true).
require "docraptor"

DocRaptor.configure do |config|
  config.username = "YOUR_API_KEY_HERE" # this key works in test mode!
end

docraptor = DocRaptor::DocApi.new

document_content = <<~'DOCUMENT_CONTENT'
  <h1>This document has printer's marks!</h1>
  <style>
    @page {
      -prince-mark-length: 1cm;
      -prince-mark-offset: 0.25cm; /* offset between marks and page area, defaults to bleed */
      -prince-mark-width: 1px;
      marks: crop cross;
      size: 8cm 8cm;
      -prince-trim: 0.25cm;
      bleed: 0.75cm;
      margin: 0;
      background-color: #489bcf;
    }
  </style>
DOCUMENT_CONTENT

begin
  response = docraptor.create_doc(
    test: true, # test documents are free but watermarked
    document_type: "pdf",
    document_content: document_content,
    # document_url: "https://docraptor.com/examples/invoice.html",
    # javascript: true,
    # prince_options: {
    #   media: "print", # @media 'screen' or 'print' CSS
    #   baseurl: "https://yoursite.com", # the base URL for any relative URLs
    # }
  )

  # create_doc() returns a binary string
  File.write("printers-marks.pdf", response, mode: "wb")
  puts "Successfully created printers-marks.pdf!"
rescue DocRaptor::ApiError => error
  puts "#{error.class}: #{error.message}"
  puts error.code
  puts error.response_body
  puts error.backtrace[0..3].join("\n")
end
Downloads
Here are all the files you need to follow this tutorial:
Related Tutorials & Documentation
See the complete PDF tutorial list or review the documentation for additional info, such as generating asynchronous documents.